I first learned to make baklava my freshman year of college. It was spring. It was Portland. The days were starting to get longer and warmer, and I was head over heels for a guy I had just started dating.
He was a senior and he lived off-campus in a one bedroom apartment in an old building in the heart of SE Portland. His apartment had hardwood floors, vintage furniture, and string instruments hanging on the walls like art. Compared to my dorm room, his home seemed like a dream. This was 2001 and hipster, foodie and Portlandia weren't things people talked about yet, but he may or may not have embodied all three.
The first night he invited me over to his place he played a record with Yusef Lateef’s cover of Eric Satie's First Gymnopedie. I had never heard of either musician. The room, the music, and the easy conversation seduced me. We sat late into the night talking and playing records and at some point he asked me if I wanted a hibiscus tea. He brewed the tea in a small pot on the stove, mixing dried hibiscus flowers, tea leaves, honey and then pouring it into two mugs topped with a little vodka. At that point in my 18 years of limited worldly experiences I had never met anyone quite like him.
One night, he asked me if I would help him make baklava. Even then, I never turned down an opportunity to cook. We chopped up a mix of almonds and walnuts, we blended together cinnamon and sugar, we melted butter and carefully brushed it over individual layers of phyllo dough, and then we made a syrup to pour onto the baklava when it came out of the oven. The kitchen smelled like toasted buttery pastry, cinnamon and sweetness.
Soon after that night he graduated and moved away. We lost touch. I never wrote down the recipe and I have no idea who gave the recipe to him. But somehow, I always remembered how to make baklava and made it many times from that day on.
A few months ago a friend asked me to bring some baklava back from Israel and I told him I could just make him some instead. I hadn't made baklava in 5 or 6 years, but the important parts of the recipe easily came back to me and the rest I figured out or changed to my liking. This time I wrote the recipe down.
...
About baklava... it's hard to mess up, but it does has a lot of little steps. It's similar to making lasagna; it's all about layering. Traditionally baklava is made with some combination of almonds, pistachios and or walnuts. I'm using a mix of almonds and pecans because I love both of their flavors. Almonds are crunchier and pecans have a caramel-like nuttiness and softer texture that I love. You can use any combination you like.
Baklava
for the baklava-
1 16 oz. package phyllo dough, (also spelled filo and fillo), defrosted*
1 cup of unsalted butter (2 sticks), melted
1½ cups almonds, chopped fine
1½ cups pecans (or walnuts or pistachios), chopped fine
1 cup sugar
2 tablespoons ground cinnamon
¼ teaspoon ground allspice (optional)
¼ teaspoon freshly ground nutmeg (optional)
pinch of salt
for the syrup-
1 cup of sugar
⅓ cup of water
1 cinnamon stick
pinch of salt
¼ teaspoon of rosewater (optional -it's a very strong flavor, but often used in the Middle East)
¼ cup honey
Note about the dough - Phyllo dough is generally sold frozen in 1 lb. boxes. You can find it at most grocery stores near the frozen pie crusts. Allow the dough to fully defrost before using. I do this by leaving it on the kitchen counter for 5-8 hours before using (depending on how hot it is that day). If you are an amazing superstar cook and make phyllo from scratch I am humbled and impressed... but this is one of those things I feel ok about buying pre-made.
Preheat the oven to 350°F.
Line a 9" x 13" baking dish with parchment paper.
Prepare all of the ingredients for assembling the baklava:
Melt the butter in a small saucepan.
Chop the nuts. These should be chopped pretty fine but it doesn't have to be perfect. If you chop by hand the baklava will be less heavy/dense. If you don't feel like chopping that much you can use a food processor to break up the nuts into small pieces by pulsing a bunch of times until the nuts are chopped fine. Transfer the nuts to a bowl.
In a small bowl, mix together the sugar, cinnamon, allspice, nutmeg, and a generous pinch of salt.
Add 1/4 cup of the sugar mixture to the nut mixture. Stir until combined.
Lay out the phyllo dough on a clean surface. Cut it into two halves crosswise (each half will be about the dimensions of your baking dish). Stack the two halves on top of each other and cover them with a slightly damp towel. Phyllo dries out fast, and a damp towel will prevent this. Keep the phyllo covered between layers so that it never dries out as you assemble the dish.
Now you are ready to assemble:
Using a pastry brush, brush the parchment with melted butter. Place a piece of phyllo into the bottom of the dish. Brush that piece with butter. Remember to keep the stack of phyllo covered with the damp towel as you're doing this.
Place another layer of phyllo on top of the first buttered layer. Brush the second layer with butter. Repeat the process until you have stacked 10 buttered layers of phyllo.
Sprinkle 2-3 tablespoons of the sugar mixture over the top layer of phyllo dough.
Sprinkle a cup of the nut mixture over the sugar.
Drizzle a few tablespoons of butter over the nut layer.
Place another piece of phyllo dough over the nuts and brush with butter. Layer that piece of phyllo with 3 more layers (4 total).
Add 2-3 more tablespoons of sugar mixture and 1 more cup of nuts. Drizzle with butter. Add 4 more layers of buttered phyllo.
Add 2-3 more tablespoons of the sugar mixture and the last cup of nuts. Top with 6 final layers of individually buttered phyllo.
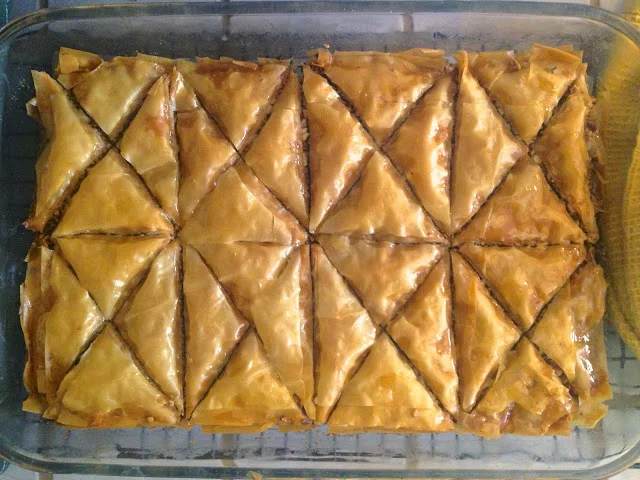
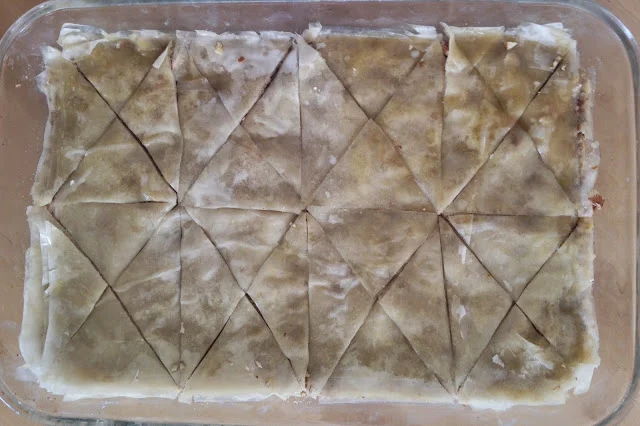
Cut the phyllo before placing it in the oven. Make sure the knife goes through every layer. It's very important to cut at this stage because after it's baked the phyllo will become crumbly, paper thin, and difficult to cut cleanly. Here is how I cut mine:
Place the baklava in the oven on the center rack and bake for 40-50 minutes or until golden brown.
While the baklava is baking, make the syrup.
Add the sugar, water, cinnamon stick, and a pinch of salt to a small saucepan. Heat over low heat until the sugar has fully melted.
Once the sugar has melted take the syrup off the stove. Add the rosewater (a little goes a lonnnng way) and honey to the syrup. Stir and reserve until the baklava is fully baked.
Finish the baklava..
Drizzle the syrup evenly over the baklava while it is still hot. Once the baklava cools down to room temp, cover the baking dish.
Let the finished baklava rest at room temp for at least 8 hours or overnight. The longer it sits the better... it needs time to soak up the syrup.
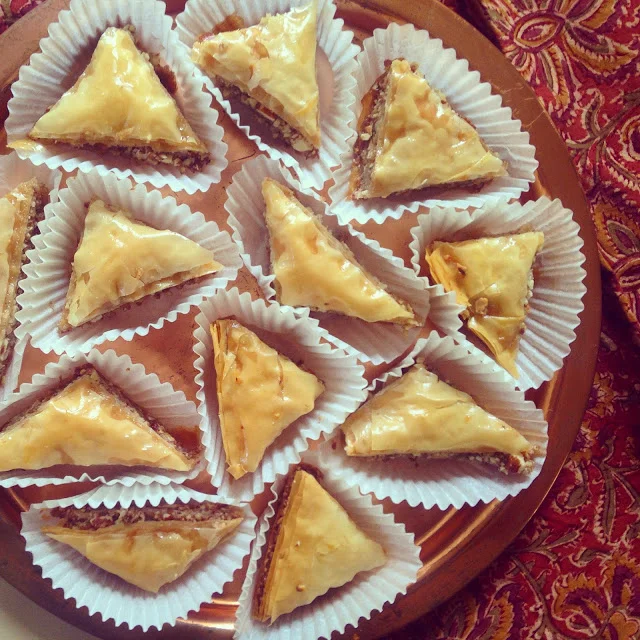
To serve, I like to place each piece into a muffin tin liner... it makes it easier to eat and serve the sticky triangles (see photo above).