• Welcome
  • Book
  • Classes
    • Recipes
    • Index
  • Writing
  • Press
  • Shop
  • Contact
Menu

Sonya Michelle Sanford

  • Welcome
  • Book
  • Classes
  • Recipes
    • Recipes
    • Index
  • Writing
  • Press
  • Shop
  • Contact

Rice Pudding

March 22, 2022

Rice pudding may differ by country and region but typically consists of some form of rice, milk, and sugar. In Indian kitchens, you’ll find kheer (or payasam), a rice pudding made with basmati rice, milk, or coconut milk, that is flavored with cardamom or other spices. In many Ashkenazi kitchens, rice pudding took on the form of rice kugel and was cooked in a frying pan. In former Soviet countries, rice pudding is called molochna risova kasha and is simply prepared with rice, milk, and sugar. In Turkish kitchens there’s sütlaҫ, a rice pudding made with rice flour that is served at weddings and holidays. In North Africa, and throughout the Middle East, you’ll find malabi (or mhalbiya/muhallebi), believed to be derived from sütlaҫ, it is a pudding made with ground rice or rice flour that is flavored with rose, orange, or geranium water. Portuguese-speaking countries call their rice pudding arroz doce, and in Spanish-speaking communities, you’ll find arroz con leche flavored with cinnamon or anise. Persian cooks have sholeh zard, a golden saffron-infused rice pudding made with rice or rice flour, that is aromatically flavored with rose water, cardamom, and other spices. Here in the States, you’ll typically find rice pudding made with milk, sugar, and studded with raisins.

This recipe for rice pudding is rich, silky, and deeply vanilla flavored. I recommend using good quality Arborio or short-grain rice, as it offers a firmer and creamier texture in the pudding; but you can substitute Arborio for long-grain rice. Whole milk and a little half & half make this pudding decadent and silky, but you can substitute whole milk for reduced-fat milk for a lighter and slightly less creamy pudding. For a non-dairy version, substitute the milk with full-fat canned coconut milk, and the rice pudding will be just as creamy, but with added coconut flavored. Using a vanilla bean provides a special kind of decadence to this rice pudding; if you can’t get your hands on a whole bean, you can use vanilla paste or extract in its place. You can keep your pudding plain, or add raisins or toppings. I like mine with citrus for a hit of acidity and brightness; and I drizzle date syrup on top just before serving, for an extra molasses-like hit of sweetness. Rice pudding can be served warm or chilled. However you like to eat or serve this pudding, it’s addictively comforting.


Vanilla Bean Rice Pudding

Serves 4

Prep time: 5 minutes

Cook time: 40-45 minutes


Ingredients:

  • ½ cup Arborio or short-grain sushi rice

  • 3¾ cup whole milk (or substitute with low-fat milk, or coconut milk)

  • ¼ cup half & half, or milk

  • 3 Tbps sugar

  • ½ a vanilla bean or 1 tsp vanilla paste, or substitute with 2 tsps pure vanilla extract

  • Pinch of salt

  • 2 Tbsps raisins or currants (optional)

Toppings:

  • Citrus segments or berries

  • Date syrup

Directions:

Rinse the rice well. In a medium pot, combine the rice, milk, half & half, sugar, and a pinch of salt. Split the vanilla bean, scrape out the seeds into the pot, or add the vanilla paste, and stir. If using vanilla extract, do not add it at this point. Bring the mixture up to a boil, and lower the heat to a gentle simmer. Simmer for 40-45 minutes, stirring occasionally so the mixture doesn’t stick to the bottom of the pot. Once the liquid has reduced and the mixture is thick and creamy, remove the pudding from the heat. Stir in the raisins and vanilla extract if using. Allow the pudding to cool for at least 10 minutes before serving or chilling.

You can serve rice pudding warm or chilled. Top with a drizzle of date syrup and citrus segments if desired.


In Dessert, Holiday, Vegetarian Tags Rice Pudding, Jewish Food, Comfort food, Pudding, Arborio Rice pudding, vanilla rice pudding, Classic rice pudding, classic comfort food, dessert
Comment
blueberrydanish1.jpg

Blueberry Cheesecake Danish

May 6, 2021

The danish came into being as a result of a kitchen mishap and a workers’ strike. In the early 1600s, a French baker forgot to add butter to his flour at the “right” time, and in an attempt to salvage his pastry he folded chunks of butter into his flour mixture. He inadvertently created a delicious flaky puff pastry dough. From there, danish-like pastries were made in France, then Italy, and Austria. A few hundred years later during a labor strike in Denmark in 1850, business owners hired bakers from abroad to replace local workers. Several such Austrian bakers began making danish-like pastries, and when the strike was over, Danish bakeries continued to bake and improve upon these newly beloved pastries. In 1915, a Danish immigrant chef baked danishes for Woodrow Wilson’s wedding to great success and acclaim. Soon after, the same baker encouraged a New York Jewish restauranteur to start selling the pastries at his establishments. Danishes have been a staple in bakeries and delis across the country ever since. 

Danishes are typically made with puff pastry, which is a buttery laminated dough. If you love baking projects you can make this recipe with homemade puff pastry. For a quicker and easier danish, pre-made puff pastry is ideal. Any store-bought frozen version will work, but using an all-butter puff pastry will yield better quality and flavor. These pastries are crispy on the edges with a buttery flaky dough, and soft in the middle with a fruity cheesecake-like filling. Always a crowd-pleaser, they’re perfect for any holiday brunch or lunch spread.

Blueberry Cheesecake Danishes 

Makes 12 danishes

For the pastry:

  • 1 (17.25 oz or 1 lb) package all-butter puff pastry, defrosted

  • 1 egg, beaten

  • Turbinado sugar (or any course sugar), for sprinkling


For the cream cheese filling:

  • 1 (8 oz) block cream cheese

  • 3 Tbsps sugar

  • 2 tsps vanilla extract

For the blueberry sauce:

  • 2 cups blueberries (fresh or frozen)

  • ½ cup water

  • ¼ cup sugar

  • Juice of ½ a lemon, or to taste

  • 1 Tbsp cornstarch + 1 Tbsp water, whisked together 

  • 1 teaspoon vanilla extract

For the blueberry sauce:

In a medium pot combine the blueberries, sugar, water, and lemon juice. In a small dish, whisk together the cornstarch and water and reserve. On medium-high heat, bring the mixture up to a simmer. When the blueberry mixture starts to bubble, add in your slurry of cornstarch and water. The sauce will immediately begin to thicken. Stir and let the blueberries simmer for 2 more minutes until the sauce is thick, easily coats a spoon, but the blueberries still hold their shape. Turn off the heat and add in the vanilla.

Remove from the heat, and allow the sauce to fully cool. Transfer to the fridge or freezer to cool the sauce quickly.

For the cream cheese filling:

Using a handheld mixer or stand mixer fitted with a paddle attachment, beat the cream cheese, sugar, and vanilla on medium speed until light and fluffy, about 2-3 minutes. To make this without a mixer, allow the cream cheese to come to room temperature, combine it with sugar and vanilla, and beat vigorously together with a wooden spoon.

Assemble the danishes:

Preheat the oven to 350°F.

Roll your puff pastry sheets into a 12” x 8” rectangle (if it is already roughly this size, there is no need to roll it out). Divide the pastry into even-sized 3” x 4” rectangles. For square danishes, roll your pastry into a 12” x 12” square, and cut them into  4” x 4” squares. 

Using a small paring knife, gently score each rectangle with a ½” border, so that there is an outline of a smaller rectangle inside each pastry. Transfer the squares to two parchment-lined baking sheets, and place them at least 1” apart.

Add a heaping tablespoon of the cream cheese mixture to the center of the rectangle. Using an offset spatula or the back of a spoon, spread the mixture into an even layer, so it roughly fills only the interior rectangle of the pastry. Top the cream cheese with a tablespoon of the blueberry sauce. 

Before baking, brush the border edges of the pastry with the beaten egg, and sprinkle Turbinado sugar on top of the egg wash. Bake for 22-25 minutes, or until the pastry has puffed up and is deep golden brown in color. Allow the pastry to cool for 15 minutes prior to serving. Danishes are best eaten the same day they are made and can be stored at room temperature. If you have leftovers, they can be reheated in an oven or toaster oven the next day. 

assembling_danishes.jpg

To make ahead:

Form the danishes up to the point of topping them with blueberry sauce. Freeze the cream cheese filling-topped danishes in a single layer, then transfer them to an airtight container or bag. If making more than a week in advance, freeze the sauce, and then defrost before assembly. 

When ready to bake, top the danishes with the blueberry sauce as instructed above. Add the egg wash and sugar to the edges of the frozen pastry. Bake as directed until golden brown. Frozen pastry may take 3-5 minutes longer to bake.

In Holiday, Dessert, Vegetarian Tags Danish, Blueberry Danish, Blueberry cheesecake danish, easy danish, dessert, easy baking
Comment
IMG_3351.JPG

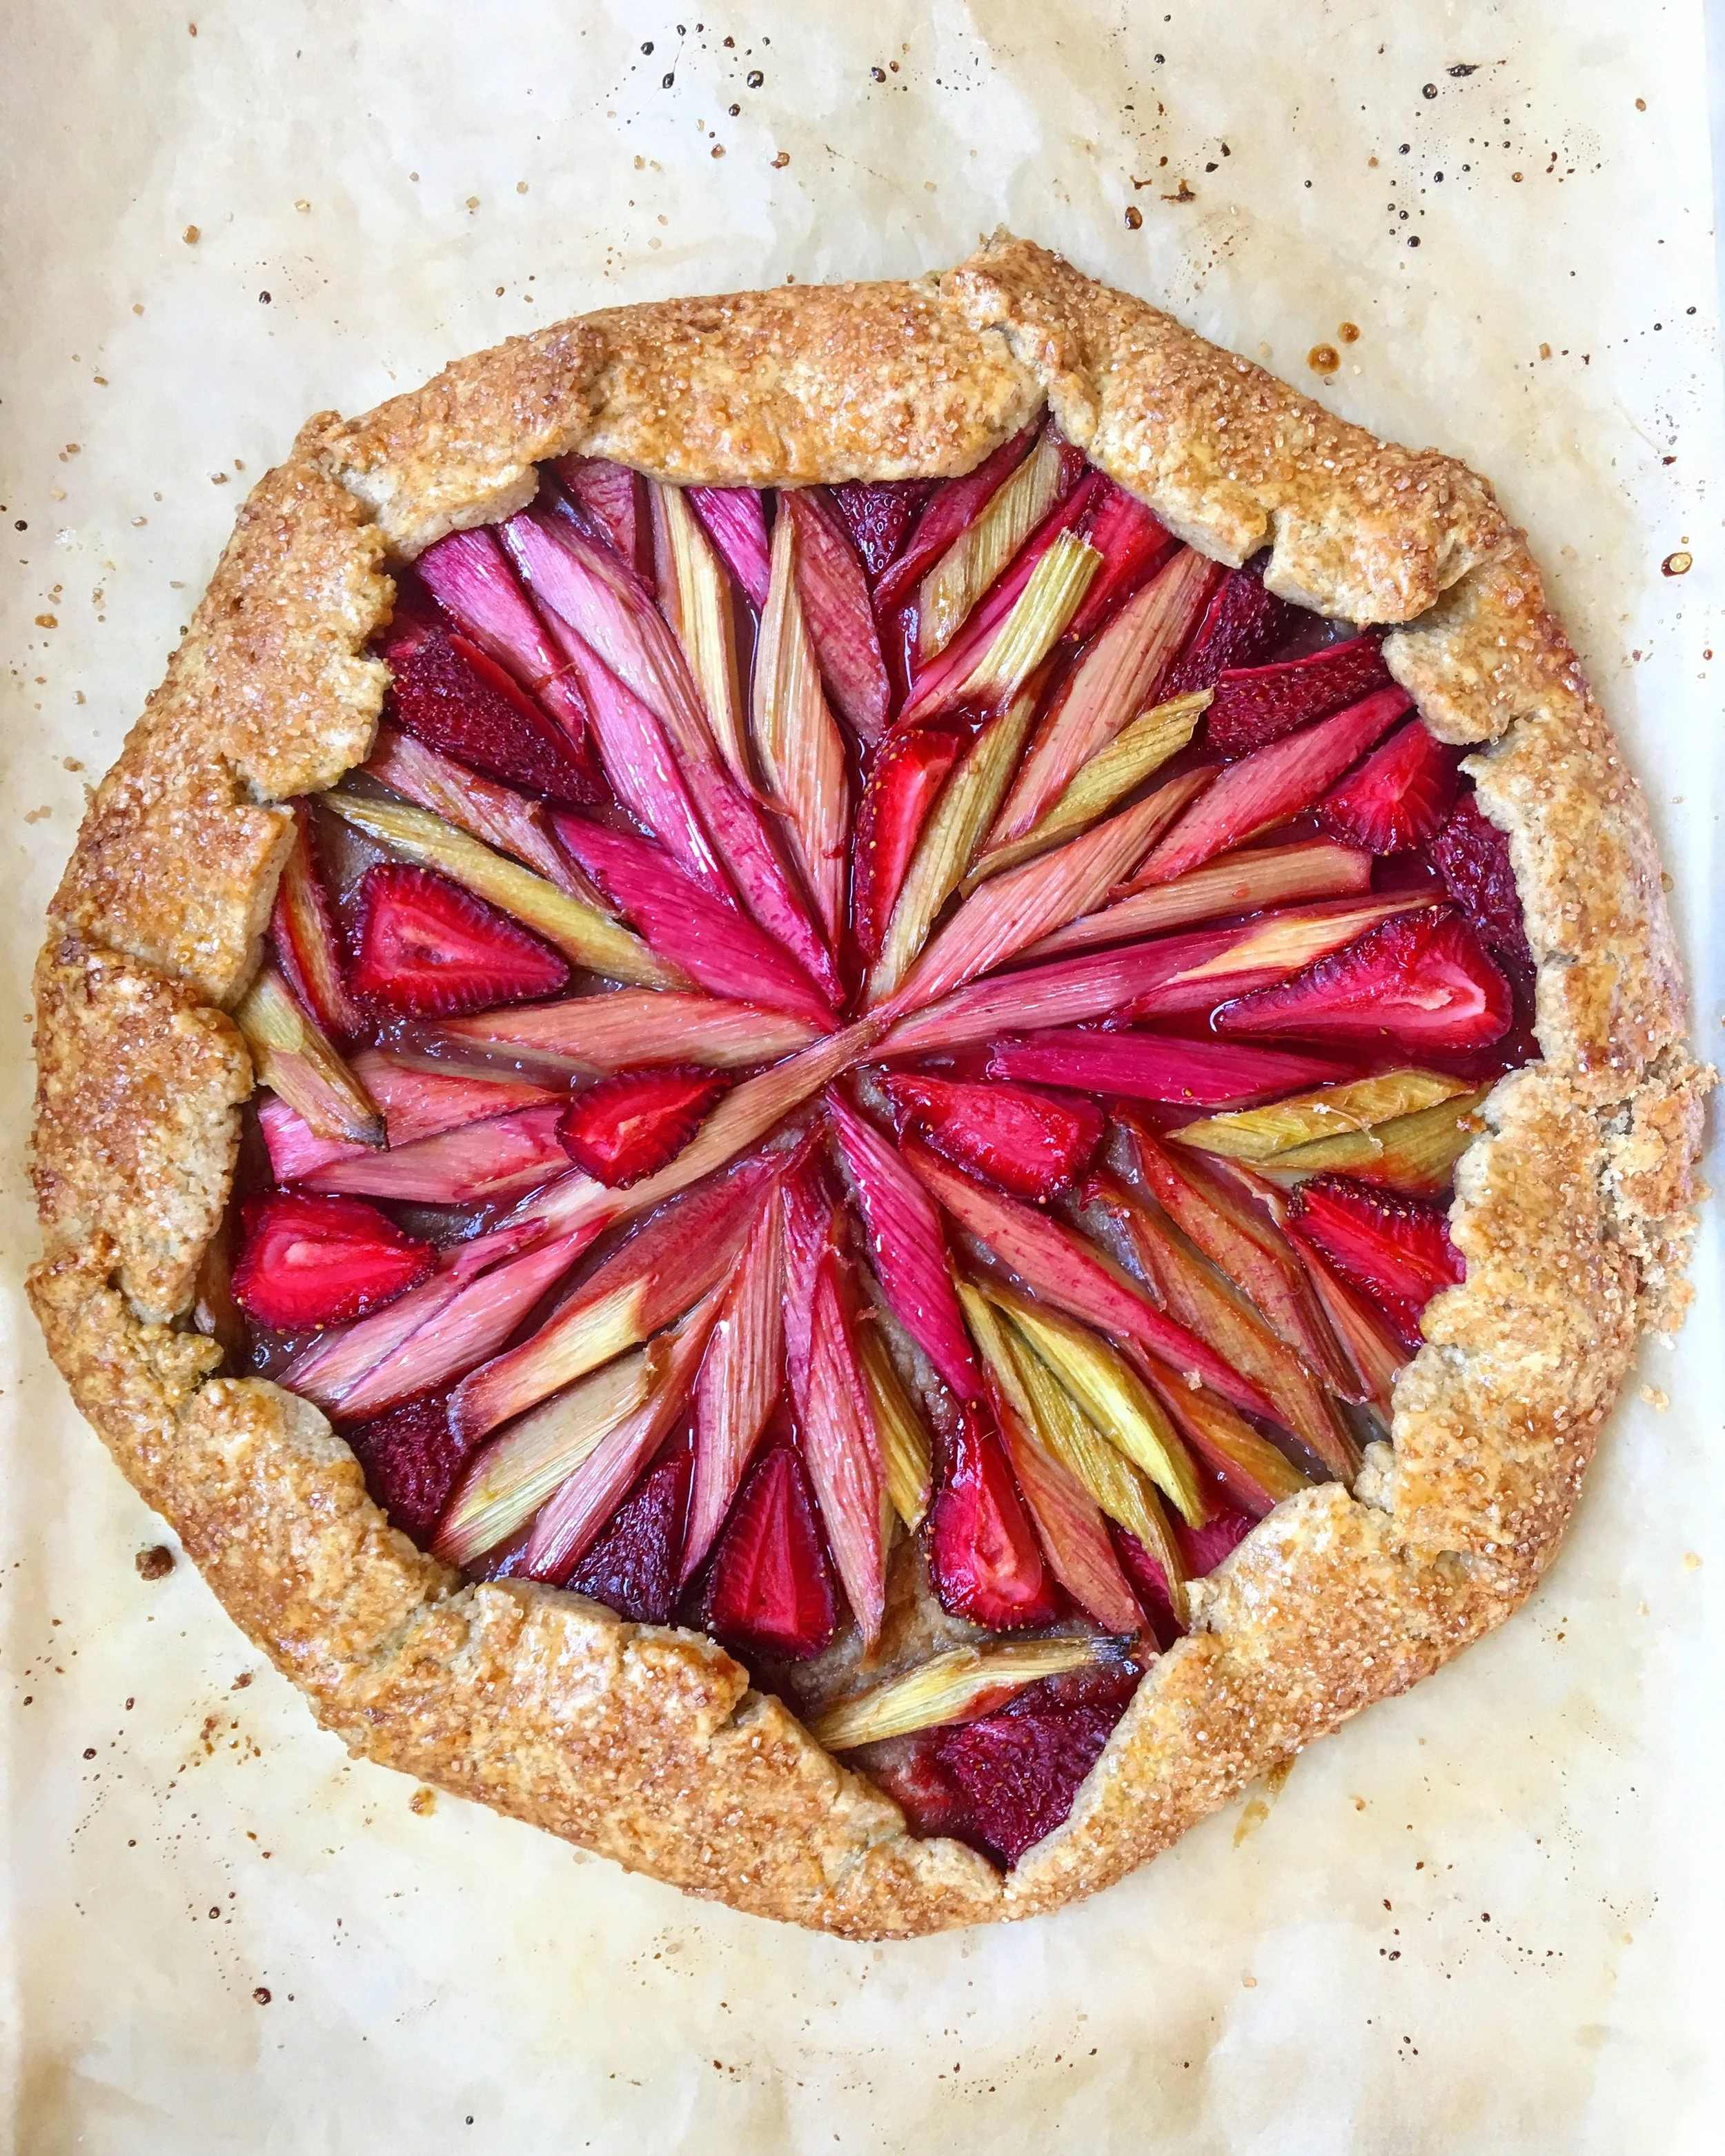
Rhubarb and Strawberry Galette

May 10, 2018

Galettes are just about my favorite thing to bake. I like the ratio of dough to filling. I like that the results of most galettes aren't too sweet. And I love the beauty of the arrangement of fruit against a browned flaky crust.

I use my go-to crust recipe/ratios for every galette, but for the filling I rarely use a recipe. I'll use fruit that's in season, toss them with sugar, vanilla/lemon zest, and let them hang out for an hour while the dough is chilling in the fridge. 

This galette was no different. I had a bunch of rhubarb that I brought home from work, and I had a handful of good strawberries too. I also had some rye flour I wanted to use up. The rye flour went into the dough, and the fruit got added to the filling. A short time later, the galette came out of the oven, warm and fragrant. This galette is perfect for any beautiful spring day.

Rhubarb Strawberry Galette

For the crust:

  • 1 cup all purpose flour
  • 1 cup rye flour (or all purpose flour)
  • 2 Tablespoons sugar
  • 3/4 teaspoon kosher salt
  • 2 sticks butter, cold and cubed
  • 1 Tablespoon apple cider vinegar
  • 3-4 Tablespoons ice water
  • 1 egg yolk + 1 teaspoon of water (for the egg wash)
  • Turbinado sugar, to sprinkle on top

For the filling:

  • 1 lb rhubarb, cut into equal-sized pieces
  • 1 cup strawberries, halved or quartered depending on size
  • 1/2 cup sugar
  • 1 teaspoon vanilla extract

For the crust:

In a food processor: pulse the flour, rye, sugar, and salt together. Add the cubed cold butter and pulse until pea-sized crumbs form. Add the apple cider vinegar and ice water and pulse until the dough just gets combined and forms a ball. Be careful not to over-mix.

By hand: whisk together the flour, rye, sugar and salt. Add the cubed cold butter and combine with the flour with a pastry cutter or by hand until pea-sized crumbs of dough form. Add the apple cider vinegar and ice water and incorporate quickly with your hands until a ball of dough is formed. Be careful not to over-mix.

Form the dough into a round disc shape, and tightly cover with plastic wrap. Allow the dough to chill for at least 1 hour, or overnight.

For the galette:

Combine the cut rhubarb and strawberries with the sugar and vanilla. Allow to sit for 1 hour.

Preheat the oven to 375°F.

Roll out the dough into a circle about 1/4" thick. The edges don't have to be perfectly round, and the dough doesn't have to be a perfect circle either. Transfer the dough onto a parchment-lined baking sheet

Add the macerated fruit to the dough, leaving a 2-3" border around the perimeter. Fold over the dough over the fruit, overlapping as you fold each piece.

Brush the dough with egg wash and sprinkle with Turbinado sugar. You can sprinkle the inside of the galette with sugar if you like it extra sweet, too. 

Bake for 45-50 minutes, or until golden brown with tender rhubarb.

Serve warm or at room temperature. Keeps at room temperature. covered, for 1 day. 

IMG_3339.JPG
In Breakfast, Dessert, Holiday Tags Rhubarb, Strawberry, Galette, Rhubarb galette, rye, rye galette, dessert, spring, baking, homemade
1 Comment

Syrniki (Farmer's Cheese Pancakes) with Vanilla Strawberry Rhubarb Compote

May 30, 2017

As a child, I would often find my mother or my grandmother standing over the stove making a fresh batch of farmer’s cheese. In a large pot, I’d find a wide open half gallon milk carton sitting in simmering water. With a little lemon juice the milk transformed from liquid to solid. Strained of any excess liquid it would be transferred to the fridge, where there seemed to always be a never-ending supply.

That homemade farmer’s cheese (“tvorog”in Russian) ended up in all kinds of things: blintzes, piroshki, and on its own served as a side at breakfast. It also ended up in a pancake form called syrniki (pronounced: syr-nee-kee). Syrniki can be made with farmer’s cheese, cottage cheese, or quark.“Syr” means cheese in both Russian and Ukrainian, and these cheese pancakes are commonly made in those parts of the world; it’s also the part of the world that my family comes from.

I like to think of syrniki as deconstructed blintzes - all the good parts with less work. The outside of the syrniki have a satisfying crispness that differs from grain-based pancakes. The inside stays creamy and fluffy. They are vaguely reminiscent of the best kind of latke. Syrniki are also perfect vehicles for all manner of sweet things, and I love them topped with strawberry rhubarb compote. The sweetness of the strawberry and tanginess of the rhubarb are the perfect compliments to the creaminess of the pancakes.

If you’re not buying into the concept of cheese pancakes, the strawberry rhubarb compote is great all on its own. It also goes beautifully with a simple scoop of vanilla ice cream, or as a topping on oatmeal, scones, yogurt, or your more “traditional” pancake.

Enjoy!

Syrniki with Vanilla Strawberry Rhubarb Compote

Serves 4


For the syrniki-

  •  1 lb. farmer’s cheese, about 2 cups
  • 2 large eggs
  • 1 tablespoon sugar, or to taste
  • 1 teaspoon pure vanilla extract
  • Big pinch of salt
  • 1 teaspoon baking soda
  • 1 teaspoon oil
  • ½ cup all purpose flour, plus more for dusting
  • Butter or oil, as needed

In a bowl, mash the farmer’s cheese until it is well broken up with a fork. Add the eggs, sugar, vanilla and salt to the cheese, and combine until mostly smooth.

In a small dish, combine the baking soda and oil. The baking soda may bubble slightly. Add the baking soda mixture and the flour to the cheese mixture and stir until well-combined.

Generously dust your work surface with flour. Place one heaping tablespoonful at a time (about ¼ cup) of the batter onto the floured board. Sprinkle more flour over the top of each small mound of batter.

Form the batter into round pancake shapes, about ¾” thick. You can be really generous with the flour;  it will help the pancakes keep their shape in the pan.

Heat a large pan or a griddle over medium-low heat (I like to use cast-iron). Add a few tablespoons of butter or oil to the pan. Place the pancakes in the pan and cook over medium-low until golden brown on each side, about 3-4 minutes per side. Two important notes: do not crowd the pan as the pancakes expand and puff up as they cook, and do not rush the cooking process. Cook the pancakes in batches, adding more butter/oil as needed. Keep the heat pretty low, and allow the pancake to really cook on one side before flipping. Once it is golden brown, it will begin to unstick and will make flipping much easier. If your pancake falls apart a little, have no fear, you can nudge it back into a circular shape with a spatula and continue to cook it.

Serve warm with compote or your favorite pancake toppings.

For the vanilla strawberry rhubarb compote-

  • 1½ lbs. (700 grams) strawberries, hulled and quartered (about 4 cups)  
  • ½ lb. (250 grams) rhubarb, chopped into ½” chunks (about 1½ cups)
  • ¾ cup (165 grams) granulated sugar
  • 1 vanilla bean, split (or substitute with 2 teaspoons vanilla extract)
  • 2 tablespoons fresh lemon juice
  • Pinch of salt

Combine half of the cut strawberries (about 2 cups) with all of the rhubarb and granulated sugar in a pot. Split the vanilla bean, scrape the seeds into the pot and add the pod as well. Add the lemon juice and salt.

Over medium heat, heat the berry mixture and bring it to a boil. You may wonder how the heap of strawberry and rhubarb will become liquid, but in a few moments the juices will be released and no added water will be needed. Once the mixture comes to a boil, lower the heat and simmer until the rhubarb just starts to break down and is tender, about 5 minutes.

Remove the mixture from the heat and stir in the remaining fresh strawberries. Allow the mixture to cool, then transfer to the fridge for at least 1 hour, or overnight. It keeps well in the fridge for a week.

In Dessert, Holiday, Breakfast Tags Syrniki, cheese pancakes, pancakes, strawberry, rhubarb, compote, strawberry rhubarb compote, dessert, breakfast
Comment
Photo by Eric Slatkin

Photo by Eric Slatkin

End of Summer Raspberry Mocha Icebox Cake

August 29, 2016

This is the perfect cake for too-hot-to-turn-the-oven-on weather. It's still too-hot-to-turn-the-oven-on weather in LA, and it will likely remain that way for a few months. Fall is creeping up in its own subtle ways (although this is the time of year I get most homesick for the Pacific Northwest). The days are getting shorter, the school bells ring across the street, and the nights are a little cooler. Regardless of the temperature, I love having a dessert recipe that requires zero baking. This is also a great make ahead dessert. You can whip this up the night before you're having people over and it will only taste better the next day. It's the perfect thing if you're having guests coming over to dinner after rushing home from work. Also, it's hard to go wrong with whipped cream, chocolate, and raspberries.

Some notes...

1) If you can't find chocolate wafers you can use any cookie you'd like. Even chocolate chip cookies will work. The thinner the better.

2) If you hate coffee flavor, omit entirely. You could also add more cocoa instead.

3) If you can't find coffee extract, you can omit as well. Add a little more instant espresso and a drop of vanilla extract would be nice

For a video tutorial, you can see this recipe over at Assembly Line.

Enjoy!

Raspberry Mocha Icebox Cake

  • 2 cups heavy cream

  • 8 oz mascarpone

  • ¾ cups sugar, divided

  • 2 tablespoons unsweetened cocoa powder

  • 2 tablespoons instant espresso powder

  • 1 teaspoon pure vanilla extract

  • 2 teaspoons coffee extract (or substitute with more espresso powder)

  • 3 pints (500 g) fresh raspberries, plus more for garnish

  • 2 packages chocolate wafers (9 oz/225 g per package)

  • Shaved dark chocolate, for garnish

Using a stand mixer or handheld electric mixer, combine the heavy cream, mascarpone, ½ cup of sugar, cocoa powder, espresso powder, vanilla extract, and coffee extract together. Whip the mixture until it forms firm peaks.

In a medium bowl, combine the raspberries with the remaining ¼ cup of sugar. Smash the raspberries with the sugar until they are roughly broken up.

To assemble the icebox cake, use a 8-9-inch springform pan. Line the bottom of the pan with a layer of chocolate wafers. Slightly overlap the wafers to form the layer; if there are any gaps you can break up some of the wafers to fill the holes. Top the layer of chocolate wafers with a quarter of the cream mixture. Top the cream mixture with a third of the raspberry mixture. Add a second layer of chocolate wafers, top with another quarter of the cream mixture, and another third of the raspberry mixture. Add a third layer of chocolate wafers, top with another quarter of the cream mixture, and the last third of the raspberry mixture. Add a final fourth layer of chocolate wafers and top with the remaining cream mixture. Smooth the top layer with an offset spatula, cover with plastic and refrigerate for 8 hours or overnight.

Prior to serving, run a knife along the edge of the pan and remove the sides. Garnish with dark chocolate shavings and fresh raspberries. Slice and serve.

In Dessert Tags Icebox cake, cake, no-bake cake, easy dessert, dessert, raspberry, mocha, chocolate, chocolate dessert
Comment

Savory Hamantaschen - Leek, Fig and Cambozola Cheese

March 20, 2016

Hamantaschen. Triangular. Filled with stuff. Made for Purim. Meant to resemble Book of Esther’s Haman. Also maybe meant to resemble aforementioned defeated enemy’s ears (in Israel Hamantaschen are called “Oznei Haman” - translation from Hebrew: Haman’s ears). Whatever they are, they are defined by their shape. There are endless variations on their dough, their size, their flavors, and their fillings.

This year, like many other years, I continue to explore the possibilities of what Hamantaschen can be. I experiment with the dough. Egg or no egg? Butter or margarine? Sweet or savory? Traditional fillings or crazy fillings? I'm still seeking my perfect version of a sweet, not-too floury dough , but I am increasingly happy to eat a pastry that is a little more savory. While it has a note of sweetness, this hamantaschen is more appetizer than dessert. The dough is the same used in flaky pie dough or crostatas, the filing has leeks, fig preserves and Cambazola cheese. The result is salty, sweet, and rich.

As a cautionary note, the impulse may be to fill these generously with your filling; exert restraint, it will seem like too little but any more will cause the cookie to overflow or taste too filling-heavy. Another cautionary note, make sure to really pinch shut the edges of each hamantaschen. These tricky guys like to unravel in the oven any chance they get.

Savory Leek, Fig, and Cambozola Hamantaschen

Makes approximately 20

for the dough-

  • 2½ cups all purpose flour

  • 2 tablespoons sugar

  • 1 teaspoon kosher salt

  • 1 cup unsalted butter (2 sticks), cold

  • 2 teaspoons apple cider vinegar, cold

  • 6-8 tablespoons ice cold water

  • 1 egg, beaten for the egg wash

  • freshly ground black pepper, to taste

for the filling-

  • 2 large leeks, diced

  • 2 tablespoons unsalted butter

  • ½ teaspoon kosher salt

  • ¼-½ teaspoon fig preserves per hamantaschen

  • ½ teaspoon Cambozola or creamy blue cheese per hamantaschen

for the dough-

In a food processor, add the flour, sugar and salt. Pulse a few times. Add the cold cubed butter. Pulse until the mixture forms pea-sized crumbs of butter and flour. (If doing by hand, using a pastry cutter combine the dry ingredients with the butter until pea-sized balls form).

To the food processor add the apple cider vinegar, and the ice water a few tablespoons at a time. Pulse until the mixture comes together in a ball. If the dough doesn’t stick together easily between your fingers, add another tablespoon of water. When it is done, the dough will be slightly crumbly but will easily form into a ball. Form the finished dough into a flattened disc, wrap in plastic and refrigerated for 2-3 hours or overnight.

for the filling-

Clean and dice the leeks. To a skillet over medium low heat, add the butter. Add the leeks to the pan and season them with salt. Sauté until the leeks are soft and starting to caramelize (turning golden but not crispy and browned), about 10-15 minutes

to assemble your hamantaschen-

Preheat the oven to 375°F. Line a baking sheet with parchment paper.

Flour your surface and rolling pin lightly. Roll out the dough until about ¼-inch thick. Using a 3-inch biscuit, cookie cutter, or even a drinking glass, cut out rounds from the dough. Fill each round with ½ a teaspoon of the leek mixture, ½ a teaspoon of fig preserves, and ½ a teaspoon of cambozola blue cheese. Fold over one third of the round onto the filling, fold over a second third, and fold over the last third. With each third, gently pinch and seal the edges of the dough firmly together, forming a well-secured triangle-shaped pastry. Transfer the hamantaschen onto the parchment-lined baking sheet. Make sure there is at least an inch between each pastry. You can re-roll the remaining dough and form more hamantaschen.

In a small dish, beat an egg. With a pastry brush, brush the top of the dough with the egg wash. Top with freshly ground black pepper if desired.

Bake the hamantaschen for 12-14 minutes, or until golden brown.

Once baked, transfer to a rack to fully cool. Serve at room temperature. The hamantaschen can be stored in an air-tight container for several days, if they last that long.

In Appetizer, Holiday Tags Hamantashen, hamantaschen, purim, dessert, savory, savory pastry, vegetarian, leek, fig, cambozola, blue cheese
Comment

Latest

Featured
IMG_3606.jpeg
May 27, 2025
Sheet-pan Lemony Potatoes and Baby Artichokes
May 27, 2025
May 27, 2025
IMG_3784.jpeg
May 12, 2025
The Secret to Crispy Tofu Every Time + A Sweet & Spicy Gochujang Glaze
May 12, 2025
May 12, 2025
snackingcakeslices copy.jpg
Apr 11, 2025
One-bowl blueberry lemon snacking cake (gluten-free/grain-free)
Apr 11, 2025
Apr 11, 2025
IMG_5075.JPG
Feb 24, 2025
Manti (meat dumplings) in brothy tomato sauce
Feb 24, 2025
Feb 24, 2025
matzoballsontablecloth.jpg
Jan 20, 2025
Golden Chicken Soup with Matzo Balls
Jan 20, 2025
Jan 20, 2025
harissatofuandchickpeas.jpg
Dec 18, 2024
Sheet-Pan Crispy Harissa Tofu, Chickpeas, and Broccolini
Dec 18, 2024
Dec 18, 2024
caracaracake.jpg
Dec 4, 2024
Cara Cara Orange Olive Oil Cake
Dec 4, 2024
Dec 4, 2024
IMG_0640.JPG
Nov 6, 2024
Easy Roast Turkey for Thanksgiving
Nov 6, 2024
Nov 6, 2024
IMG_3282.JPG
Sep 19, 2024
Apple and Honey Dumplings
Sep 19, 2024
Sep 19, 2024
IMG_7173.jpeg
Jul 31, 2024
Galette with any kind of fruit
Jul 31, 2024
Jul 31, 2024
IMG_4004.jpeg
May 9, 2024
Cheddar Cheese Coin Crackers
May 9, 2024
May 9, 2024
DSC02602.JPG
May 2, 2024
Asparagus, Gruyere & Swiss Tart
May 2, 2024
May 2, 2024
whitebeansoupwithzhug.JPG
Mar 11, 2024
Yemenite White Bean Soup with Zhoug
Mar 11, 2024
Mar 11, 2024
DSC02301 (1).jpeg
Jan 24, 2024
Celery, kohlrabi, date salad with toasted almond and sesame
Jan 24, 2024
Jan 24, 2024
DSC02138.jpg
Dec 3, 2023
Sweet potato latkes with cranberry salsa
Dec 3, 2023
Dec 3, 2023
kompot_main photo.JPG
Jul 11, 2023
Ukrainian Summer Fruit Kompot
Jul 11, 2023
Jul 11, 2023
cherryvareniki mainphoto.jpg
Jun 15, 2023
Cherry Vareniki
Jun 15, 2023
Jun 15, 2023
tzimmescaketopdown.jpg
Apr 19, 2023
One-Bowl Tzimmes Cake
Apr 19, 2023
Apr 19, 2023

Sign up with your name and email address to join my mailing list.

I respect your privacy.

Thank you!

Privacy Policy can be found here

All photos copyright of Sonya Sanford unless otherwise indicated