• Welcome
  • Book
  • Classes
    • Recipes
    • Index
  • Writing
  • Press
  • Shop
  • Contact
Menu

Sonya Michelle Sanford

  • Welcome
  • Book
  • Classes
  • Recipes
    • Recipes
    • Index
  • Writing
  • Press
  • Shop
  • Contact

One-bowl blueberry lemon snacking cake (gluten-free/grain-free)

April 11, 2025

Snacking cakes are typically simple cakes made with one-bowl batters, that use easy-to-find ingredients, and are baked off in a single baking dish. This simple blueberry lemon version is perfect as a grain-free/dairy-free dessert for any meal. Almond flour replaces regular flour, and well-whisked eggs and sugar help give the cake lightness and volume. You can also replace the blueberries with raspberries or blackberries; frozen or fresh berries both work in this recipe. This cake is very delicate, soft, light, and full of citrusy lemon and sweet berry flavor. It is best the same day it is baked, but still delicious (albeit a little softer) the next day.

Originally published for The Nosher

Blueberry Lemon Snacking Cake (Grain-free/Dairy-free)

Makes 1 9” round or square cake 
Prep time: 15 minutes
Bake time: 30-35 minutes

Ingredients:
3 lg eggs, at room temperature
½ cup granulated sugar
2 Tbsps oil
Zest of 1 lemon (about 2 tsps)
2 Tbsps lemon juice
1 tsp vanilla extract
¼ tsp almond extract (optional)
2¼ cups super-fine almond flour
1 Tbsp potato starch, plus more for dusting the berries
1 tsp baking powder
½ tsp baking soda
¼ tsp salt
1¼ cup blueberries, fresh or frozen
1 Tbsps turbinado or coarse sugar (optional)

Directions:

  1. Preheat the oven to 350°F. Generously grease and line a 9” round or square baking dish with parchment paper. 

  2. In a standmixer fitted with the whisk attachment, or in a large bowl using a whisk or handheld mixer, beat together the eggs and sugar until doubled in size and pale yellow, about 5-6 minutes. 

  3. To the egg mixture, add the oil, lemon zest, lemon juice, vanilla, and almond extract if using. Whisk together until just combined, being careful not to deflate the egg mixture too much.

  4. To the center of the bowl, add the almond flour, potato starch, baking powder, baking soda, and salt. Gently fold the mixture until the dry ingredients are fully incorporated into the wet ingredients.

  5. Toss the blueberries in a spoonful of starch, and add 1 cup of the berries to the batter. Gently fold and combine. 

  6. Transfer the batter to the lined and greased baking dish. Top the cake with the remaining ¼ cup of berries. Sprinkle the top of the cake with turbinado sugar. 

  7. Bake for 30-35 minutes, or until it looks evenly golden brown and set on top, and a cake tester comes out clean. Allow the cake to fully cool before serving. This cake is best served the same day it is prepared, but can be made one day in advance if needed. Top with powdered sugar, or whipped cream before serving if desired. 

In Dessert, Holiday Tags grain free, gluten free, gluten free dessert, passover recipe, passover cake, passover dessert, passover food, jewish food, blueberry lemon cake, blueberry snacking cake, flourless blueberry cake, flourless cake
Comment
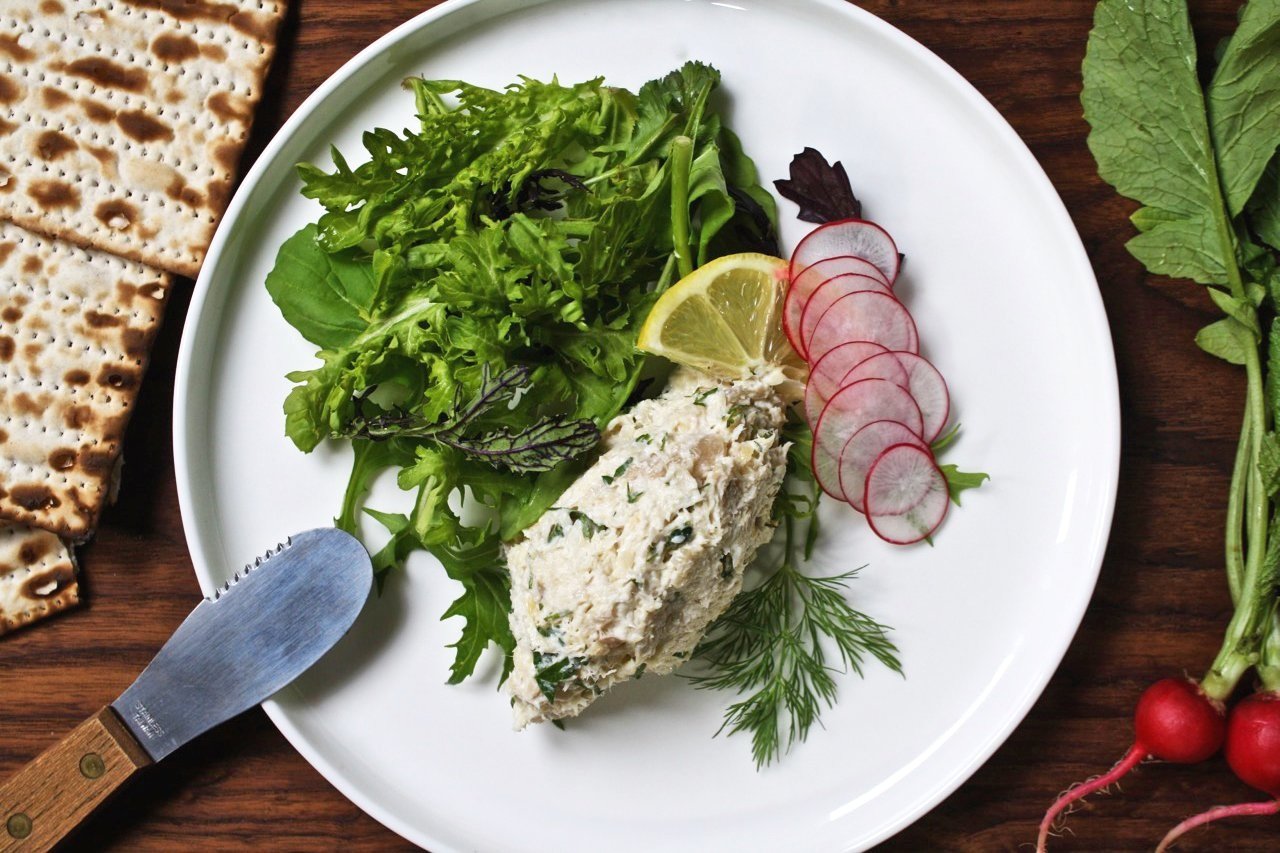
Whitefish Salad

Whitefish Salad

April 13, 2022

For the full article and more history on whitefish salad, head over to The Nosher!

There’s nothing wrong with traditional whitefish salad, but I love to add a few extra ingredients to my whitefish salad to brighten up its salty smoky flavors. For one, when I can’t find whole smoked whitefish, I use smoked trout or smoked Sable. Mayonnaise is essential, but I also add sour cream for tangy creamines (you can skip the dairy and substitute it with more mayo if desired). Fresh dill and parsley give the salad lightness, and lemon zest and juice add citrusy acidity and flavor. However you like to make it, you can never go wrong serving whitefish salad at your next holiday spread. 

SMOKED FISH SALAD 

Makes 2 cups/1 pint - Recipe can be doubled or tripled

  • 8 oz. smoked whitefish (or smoked trout or sablefish)

  • ¼ cup mayonnaise, or to taste

  • 2-3 Tbsps sour cream (or additional mayonnaise)

  • 1 Tbsp chopped parsley

  • 1 Tbsps chopped dill

  • 1 tsp lemon juice

  • ½ tsp lemon zest

  • Black pepper, to taste

Start by crumbling the fish off its skin into small pieces. Make sure to remove any bones in the process, especially if using a whole fish. 

To the fish add mayonnaise, sour cream (if using), parsley, dill, lemon juice, lemon zest, and pepper. Taste and adjust to your liking. Salad will keep for up to 1 week refrigerated.

In Appetizer, Dinner, Holiday, Lunch, Salad, Snack Tags whitefish, whitefish salad, jewish food, Jewish deli food, Jewish deli recipes, Smoked fish salad, Trout salad, Smoked sable salad
Comment

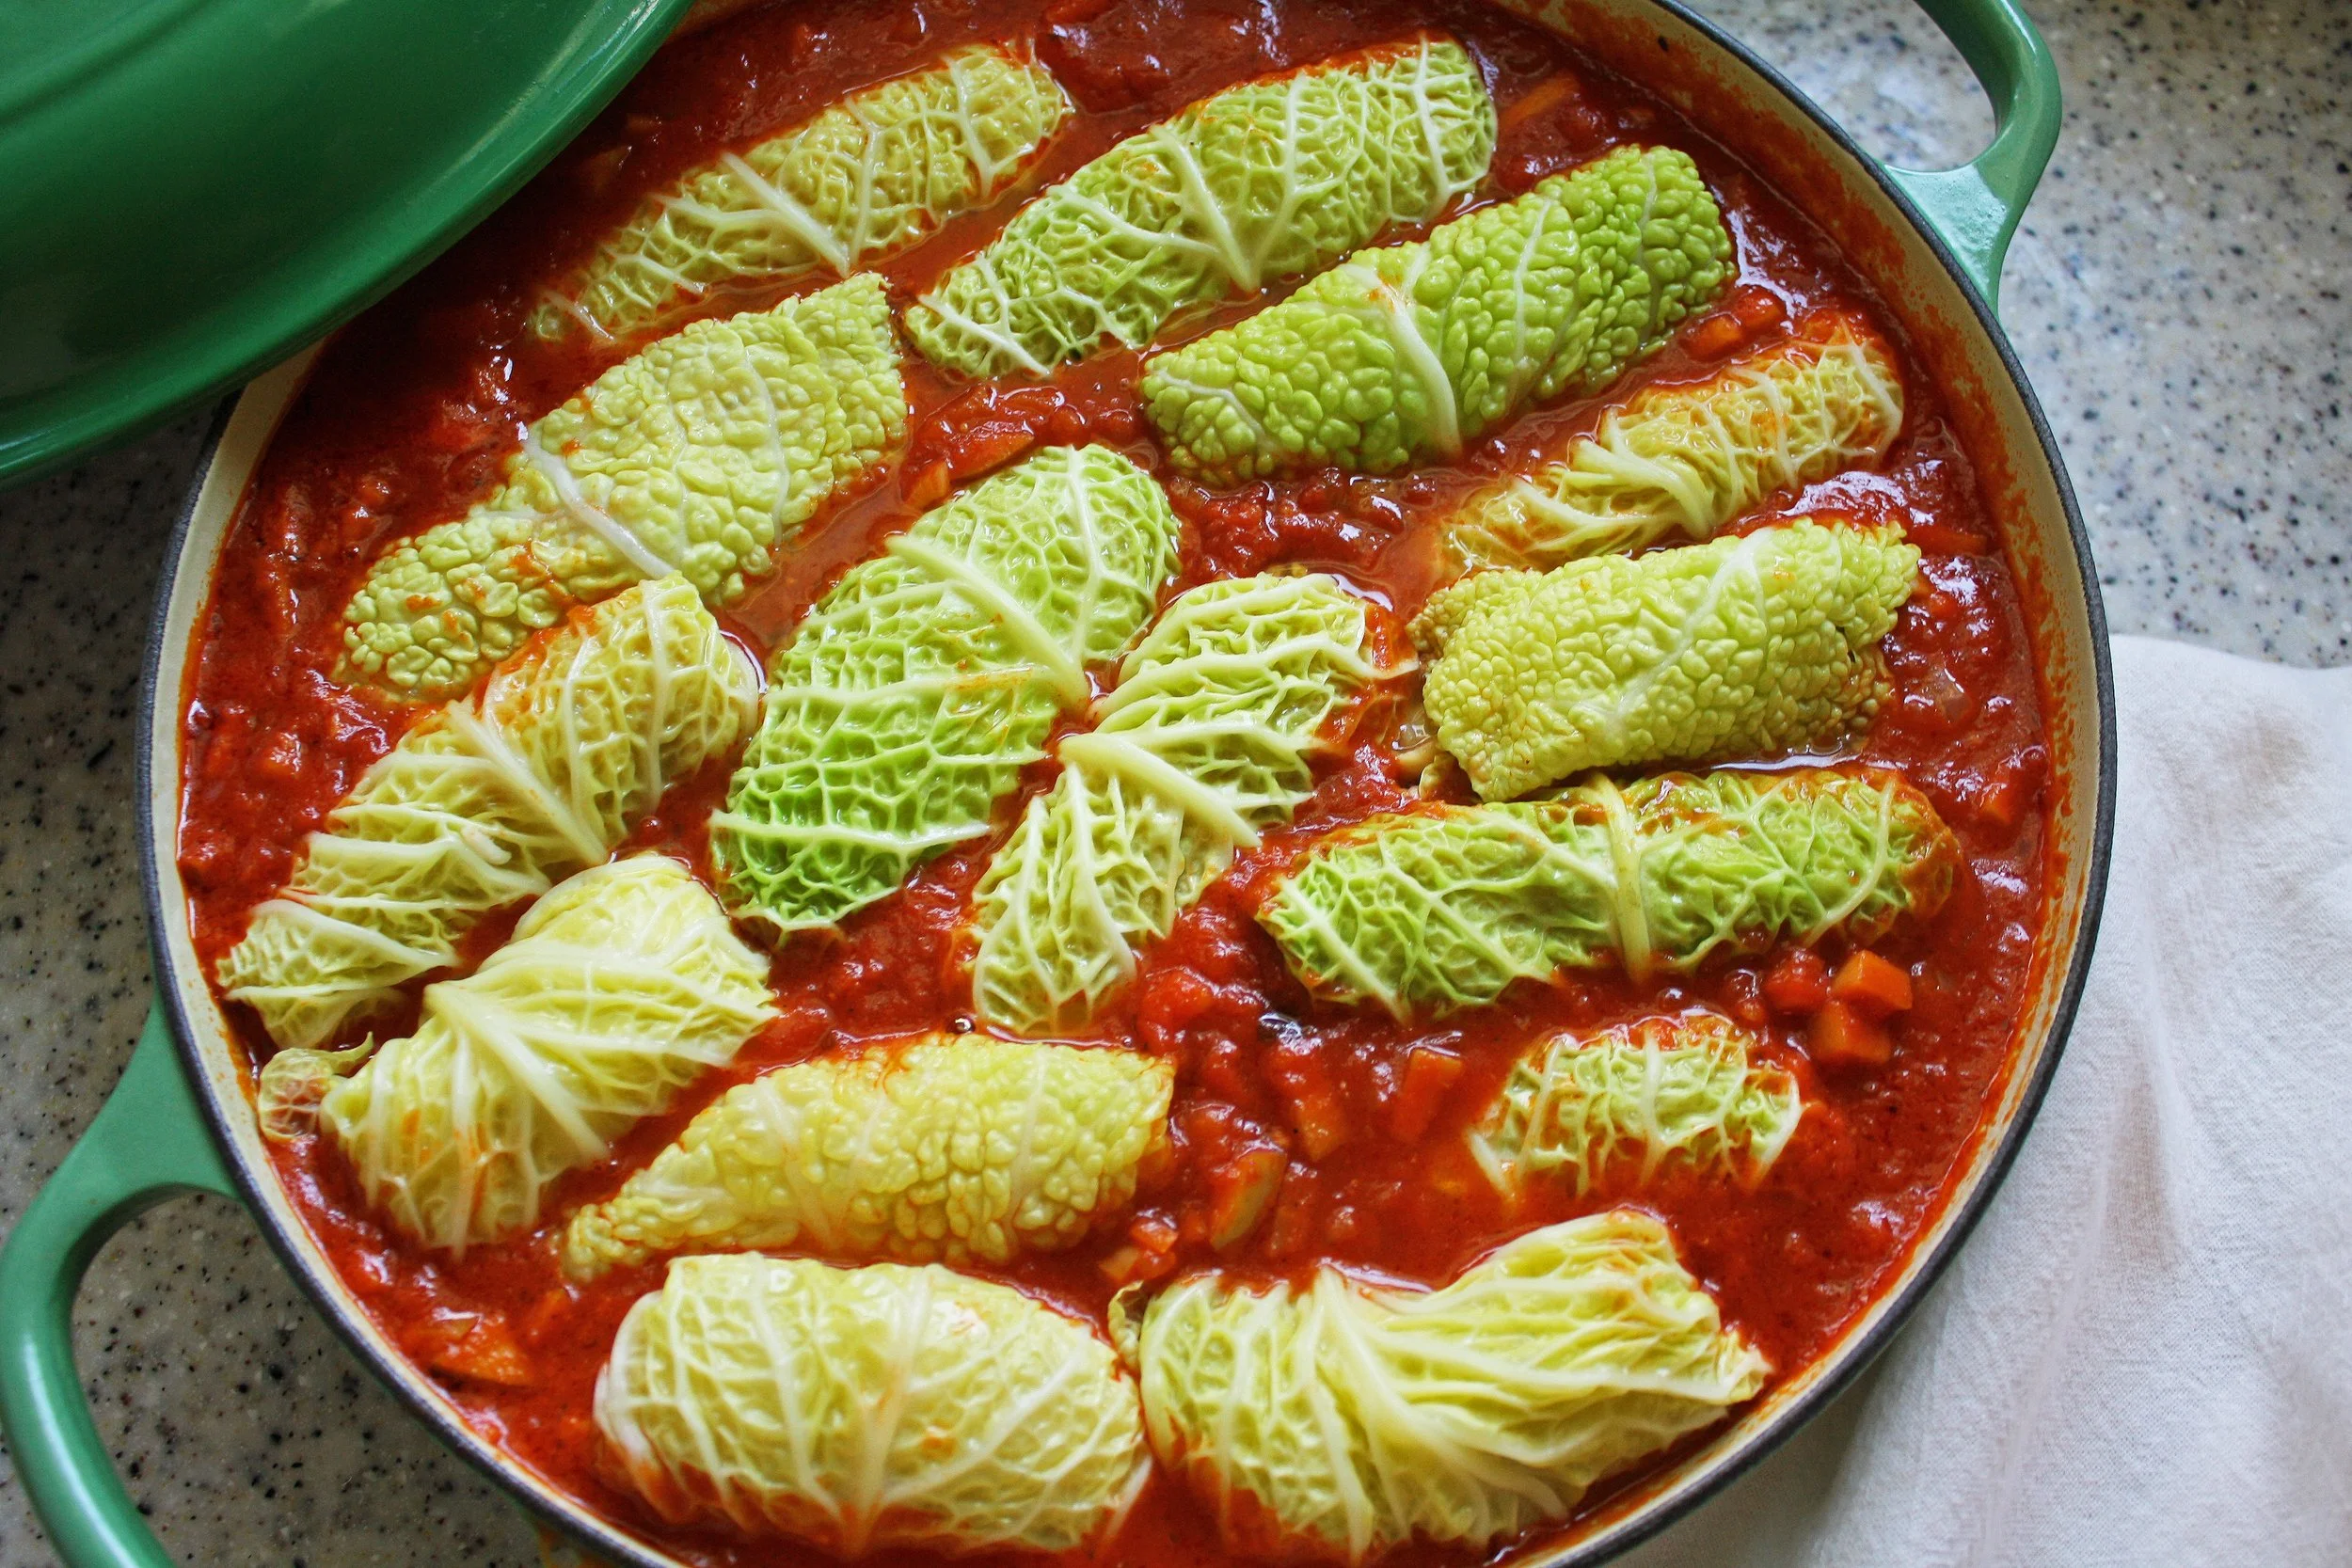
Vegetarian Stuffed Cabbage

March 23, 2022

From Italy to Poland, from Ukraine to China, stuffed cabbage is a classic comfort food in many parts of the world. While it takes some time to make, the effort put into the dish is rewarded in its results: the cabbage turns tender and sweet, and the savory filling is enhanced by the tanginess of the tomato sauce it slowly simmers in.

While stuffed cabbage is typically made with ground meat, this Ukrainian-style stuffed cabbage is vegetarian and is made with eggplant. The recipe for the filling is versatile, it is gluten and dairy-free, and it can be made vegan by omitting the egg. If you’re not a fan of eggplant, you can replace the eggplant with zucchini or your favorite vegan ground meat substitute. If you prefer meat, you can substitute the eggplant in this recipe for an equal amount of ground beef or chicken. I find the eggplant offers its own “meatiness” to the dish; and when it is peeled and cut into small cubes it becomes tender and soft, and easily absorbs the flavors of the caramelized onion, garlic, and spices that help create the unmistakable flavors of Eastern European-style stuffed cabbage. The sauce is slightly sweet and sour and demands to be eaten with a slice of good crusty bread to mop up any last drops. If you’re like my Ukrainian Jewish family, you might also want to serve this stuffed cabbage alongside creamy mashed potatoes. Top the stuffed cabbage rolls with parsley, dill, and a dollop of sour cream and you’ll have a hearty, comforting, meal.

Vegetarian Stuffed Cabbage

Serves 4-6, makes 12-13 stuffed cabbage

Prep time: 1 hour / Cooking time: 50-60 minutes

Ingredients:

For the stuffed cabbage-

  • 1 large Savoy or green cabbage

  • ⅔ cups Basmati rice, rinsed

  • 3 Tbsps oil

  • 1 large onion, diced fine

  • 2-3 cloves garlic, minced fine

  • 1½ lbs pounds (2 medium) eggplant, peeled and cubed small

  • 1 small carrot, diced fine

  • 1½ tsps garlic powder

  • ½ tsp Paprika

  • ½ tsp umami season blend/dried mushroom seasoning blend (optional)

  • Salt and pepper, to taste

  • 1 large egg, optional

For the sauce-

  • 28 oz tomato purée, plus an equal amount of water

  • ½ a large onion, chopped fine

  • 3-4 cloves garlic, minced fine

  • 1 small apple, peeled and diced fine

  • 2 Tbsps tomato paste

  • 2-3 Tbsps maple syrup, or 2 tsps sugar, or to taste

  • 1 bay leaf

  • Salt and pepper, to taste

Directions:

For the cabbage- Bring a large pot of water to a boil. Salt the water generously, and then add the cabbage to the water. Boil the cabbage for 4-5 minutes. Then remove the cabbage from the pot and allow it to cool, reserve the water to boil the rice.

 Once cool to the touch, remove the leaves, and place them on a clean kitchen towel to remove any excess liquid. The center of the cabbage/smaller leaves will not be as pliable and can be reserved for other uses.

For the filling- Bring the pot of water back to a boil, and add the rice. Boil the rice for 8-10 minutes, or until partially cooked. Drain and reserve.

To a large skillet over medium heat, add the oil and chopped onion. Allow the onion to get golden brown and slightly caramelized, stirring occasionally for about 15-20 minutes. This step takes some time but adds a lot of flavor; prep the other vegetables while the onion caramelizes. Add the garlic to the onion, and sauté for 1-2 minutes. Add the cubed eggplant and diced carrot to the onion mixture; add more oil if needed. Generously season with salt and pepper, and sauté the eggplant mixture until the eggplant is softened, about 10-15 minutes. Taste, and adjust the seasoning.

Turn off the heat. Add the par-boiled rice, garlic powder, paprika, and if using, add the umami/dried mushroom seasoning blend. Allow the eggplant filling to cool. Add the egg if using, and mix until it is well combined.

For the sauce- In a large pot or Dutch oven, sauté the onions and garlic until softened and aromatic, about 5 minutes. Add the apple, and sauté for another 2-3 minutes or until slightly softened. Add tomato paste and stir and cook for 1 minute. Add the tomato sauce, and add an equal amount of water. Then add bay leaf, salt, pepper, and maple syrup or sugar. Your sauce should start out very thin, but it will thicken as it cooks. Bring the sauce to a boil, and simmer on low for at least 30 minutes. Taste the sauce before adding the stuffed cabbage, and adjust for salt or sweetness. Dilute with more water if needed. 

To assemble - Separate the cabbage leaves, and cut out the thickest part of the center vein/core.

Fill each cabbage leaf with approximately ¼-cup of filling near the base of the leaf. Fold the base of the leaf over the filling, fold the sides of the leaf towards the center, and then roll until the cabbage is formed into a burrito-like package. Place seam-side down into the pot; cabbage rolls can be stacked on top of each other as long as they are all submerged in the sauce.

 Cover the pot, and let the cabbage simmer for 50-60 minutes on low heat, or until tender and the rice is completely cooked through. Add more water if the sauce appears too thick at any point, or when reheating. The sauce should be easily spoonable over the cabbage.

Served topped with fresh herbs and/or sour cream.

In Dinner, Lunch, Holiday, Vegan, Vegetarian Tags vegetarian stuffed cabbage, eggplant stuffed cabbage, vegan stuffed cabage, vegan, vegetarian, jewish food, vegetarian jewish food, Ukrainian food, golubtsi, vegetarian golubtsi
Comment

Vegan Carrot Lox

December 21, 2021

Carrots make a surprisingly delicious plant-based substitute for traditional lox. By cooking carrots and marinating them in a few simple and flavorful ingredients, they become smoky, salty, and bright with acidity. The combination of liquid smoke and toasted seaweed gives the carrots a transformative smoky seafood flavor. Liquid smoke can be found in most grocery stores and is made from actual wood smoke that is condensed into liquid form (and a little goes a long way). You can substitute liquid smoke with good-quality smoked paprika if desired, or omit the liquid smoke entirely for vegan lox that is less smoky. Carrot lox adds a pop of color to any brunch spread, and they pair perfectly with schmear, cucumber, fresh dill, and all the traditional bagel fixings.

Vegan Carrot Lox

Serves 6-8

Ingredients:

  • 3 large carrots, about 1 lb. 

  • Salt, as needed

  • ¼ cup water

  • ¼ cup soy sauce or tamari

  • 2 Tbsps rice vinegar or white vinegar

  • Juice of ½ a lemon 

  • 1 Tbsp maple syrup or agave

  • 1 tsp dried dill

  • ¾ tsp liquid smoke (or 1 tsp smoked paprika)

  • 1 sheet toasted Nori, or 3-4 pieces of seaweed snacks

Directions:

Bring a pot of water to a boil. Season the water generously with salt. Boil the carrots for 10-15 minutes, or until just tender when pierced with a small knife.

Peel the carrots by rubbing off their peels. Using a mandoline, vegetable peeler, or sharp knife, slice the carrots lengthwise into long strips. 

In a large bowl, combine the water, soy sauce, rice vinegar, lemon juice, maple syrup, dried dill, and liquid smoke. Whisk together, then add the nori. Add the carrot strips to the bowl and toss everything together. Transfer to the refrigerator and marinate for at least 6 hours or overnight; the carrot lox will last up to 1 week in an airtight container in the fridge.

In Appetizer, Breakfast, Dinner, Holiday, Vegan, Vegetarian, Lunch, Salad Tags vegan, vegan lox, carrot lox, jewish food
Comment
wholesharlotka.jpg

Apple Sharlotka (Apple Cake)

August 29, 2021

Apple Sharlotka is a popular Russian and Polish apple cake that is easy to prepare and requires only a handful of ingredients. This dessert is dense with apples, but the cake surrounding the fruit is light and airy.  

Sharlotka comes from a style of cake or trifle called “Charlotte Cakes,” which are typically made with ladyfingers or sponge cake. The first apple Sharlotka is credited to a French chef, who prepared it in honor of the wife of Tsar Alexander I of Russia. While early versions of Sharlotka were decadent and complicated, over time the cake has evolved into a simple treat that can be easily baked at home. My own Ukrainian grandmother made apple Sharlotka more than any other cake, likely due to the fact that it is as easy to make as it is comforting and delicious. Along with a few apples, the batter is made all in one bowl with eggs, sugar, flour, and vanilla. 

Apple Sharlotka is best made with sweet and tart Granny Smith apples, or an heirloom apple, like Winesap. When the cake comes out of the oven it will have a crisp and crackly crust on top that softens the longer it sits. Just before serving, shower the cake with powdered sugar for added sweetness on top. 

Apple Sharlotka

Serves 8-10

Ingredients:

  • 3-4 (1.5 lbs/680 g) medium apples, like Granny Smith

  • juice of ½ a lemon

  • 3 large eggs

  • 1 cup (220 g) sugar 

  • 2 tsps vanilla extract

  • ¼ tsp salt

  • 1 cup (130 g) all-purpose flour (or sub with 1:1 gf flour)

  • powdered sugar, as needed

Directions:

Preheat the oven to 350°F. Grease and line a 9” springform pan with parchment paper; you can also use e a 9” round or square baking pan for this recipe. 

Peel and core the apples. Cut the apples into 1” pieces, about ¼”-thick. Toss the apples in lemon juice, and then add them to the baking dish. 

In a large bowl using a hand mixer, or in a stand mixer fitted with the whisk attachment, combine the eggs and sugar. Alternatively, you can beat the eggs and sugar by hand using a whisk. Beat until the eggs are pale, fluffy, and have doubled in size, about 3-4 minutes. Add the vanilla extract and beat for one more minute.

Sift in half of the flour and salt to the egg mixture, and fold the dry ingredients into the batter. Sift in the remaining flour and salt, and fold them in until they are just incorporated. Be careful to gently fold in the dry ingredients, and to not overmix the batter. 

Pour the batter over the apples in the baking dish. If needed, use a spatula or spoon to smooth the batter over the top so it evenly covers the apples.

Bake for 45-50 minutes until golden brown and firm on top, or until a cake tester comes out clean. Allow the cake to cool for at least one hour prior to serving. 

Before serving, sprinkle the cake with powdered sugar. Sharlotka can be made a day in advance and stored covered at room temperature, the crust will soften as it sits. 

In Holiday, Dessert Tags apple sharlotka, jewish food, Sharlotka, Charlotka, Soviet food, Russian Food, Apple cake, Easy apple cake, Rosh Hashanah, High Holiday food, Apple cake recipe, Cake recipe, Easy cake recipe, apple cake, cake
12 Comments

Tefteli - Russian Meatballs

December 20, 2018

As published for The Nosher 

For the first five years of my life, we lived in the apartment next door to my grandparents. I may have only been a toddler, but I still have vivid memories of being in that home with its many house plants overflowing in their pots, tchotchkes and art from the former Soviet Union. What I remember most about being at my grandparents’ home was the food. Often, there was a pot of something simmering on the stove. On the best days, that pot was filled with tefteli, otherwise known as Russian meatballs. I can still see myself sitting at my grandmother’s table in front of a steaming bowl of tefteli, eagerly waiting for them to cool down so I could start eating.

 What makes Russian meatballs different from other kinds? While tefteli come in all types of variations and preparations depending on your own family’s tradition, one of their defining features is that they’re typically made with rice. It’s likely that rice was first incorporated into the dish as a means to stretch the meat, but it also adds a great texture and flavor. Unlike the Italian kind, most Russian meatballs don’t use breadcrumbs, or much by way of herbs or spice. Some folks make them with beef, some with chicken or turkey. The non-kosher versions are often made with pork, and are cooked in a creamy tomato sauce. Some cooks dust the meatballs in flour and then brown them before adding them to the sauce. Some bake them in the oven. Some make a sauce that ends up so thick it is almost shakshuka-like. Usually, shredded carrot is added to the base of the tomato sauce, adding sweetness. Tefteli are also meant to be eaten on their own as a main course, and they are frequently served with creamy mashed potatoes, but I also love them with a side of polenta, or even with just a slice of good crusty bread.

 Every time I make tefteli I try to replicate what my grandmother made for me. Yes, I’m biased, but her tefetli are the best I’ve ever tried. This recipe is fairly simple in terms of its ingredients and steps, but the key to her tefteli’s success is one step that you can’t rush or skip: caramelizing the onions. Caramelizing onions was my grandmother’s go-to flavor builder. When onions get golden and jammy from cooking slowly in a little fat, they add sweetness and umami to any dish. The rest of this recipe mainly involves adding things to a large pot. Leftover rice is great for the meatball mixture, but if you don’t have some on hand, I find the timing works out well if you cook the rice while you’re caramelizing the onions and making the sauce. I prefer to use dark meat ground chicken for this, but you can definitely make this with turkey or beef.

 This is the kind of dish that rarely gets a written recipe. I’ve given you specifics, but deviating from what is suggested will only make this better. Taste and modify your tefteli to your own liking. For instance, my mom actually dislikes rice in tefteli, so she adds breadcrumbs or matzo meal instead. I like to add chili flake for subtle heat, but that can be completely omitted. I find that these are perfect when they’re on the larger-side, but if you like smaller-sized meatballs go for that. In any form, these are best made in a big batch so that they can be shared with loved ones, and so that they can fill your home with warmth and the smell of good simple food.

Tefteli - Russian Meatballs

Serves 4-6

For the sauce-

  • 1 large yellow onion, diced small

  • 3 Tablespoons oil (sunflower, avocado, or canola)

  • 1 large carrot, peeled and shredded

  • 2-3 cloves garlic, minced fine

  • 2 Tablespoons tomato paste

  • 1 (28 oz) can crushed tomatoes

  • 2 (15 oz) cans plain tomato sauce/pureed tomatoes

  • 2 Tablespoons maple syrup or 1 Tablespoon sugar, or to taste

  • 2 teaspoons dried oregano or thyme

  • Pinch of red pepper flake, or to taste

  • 1 (28 oz) can filled with water (about 3.5 cups)

  • Salt and pepper, to taste


For the meatballs-

  • 2 lbs dark meat ground chicken or turkey

  • 2 cups cooked Basmati or Jasmine rice (about ¾ cup uncooked)

  • 1 large onion, minced very fine

  • 1 large clove of garlic, finely grated or minced

  • 1 large egg

  • 2½ teaspoons kosher salt (Diamond brand)

  • Ground pepper, to taste

  • Chopped flat leaf parsley, for garnish


For the sauce-

Add oil to a Dutch oven or large heavy-bottomed pot over medium heat. Add the diced onion to the pot. Allow the onion to soften and caramelize until golden, stirring occasionally, about 15-20 minutes (you can go for longer if you want the onion to caramelize more deeply). Add grated carrot, minced garlic, and a big pinch of salt to the pot. Stir and sauté for 3-4 minutes, or until the carrot has softened and the garlic is aromatic. Add the tomato paste and stir until everything is coated, about 1 minute. Add the crushed tomato, tomato sauce, maple syrup, herbs and chili flake to the pot. Fill the empty 28 oz crushed tomato can with water and add that water to the pot. Taste and season with salt and pepper. Let the mixture come up to a simmer.

For the meatballs-

In a large bowl, combine the ground chicken, cooked rice, and onion. I like to use a microplane to grate my garlic straight into the bowl. Add the salt, pepper, and egg. Combine everything together until well incorporated, but make sure not to overmix or the meat can become tough. Clean hands work best for this. Before I cook the meatballs, I like to take a spoonful of the mixture and cook it in a small pan to taste for seasoning. I add more salt or pepper accordingly.

meatballfilling.JPG

Form the ground meat mixture into even-sized balls. I prefer my tefteli slightly larger than a golf ball, but make them according to your own preferences. Drop the formed meatballs into the simmering sauce. Make sure the sauce returns to a simmer, then lower the heat and partially cover the pot with a lid. Simmer the tefteli for 35-45 minutes or until cooked through. If you find the sauce is too thick you can add more water. If you want the sauce less thick, you can simmer it for longer to reduce and thicken.

Serve the meatballs with a generous ladle of sauce, topped with chopped fresh parsley alongside mashed potatoes, your favorite side, or slices of good bread. 

Meatballs can be made several days in advance, and they freeze and reheat well.

biteoftefteli.jpg
In Dinner, Lunch Tags Rusian food, Meatballs, Russian Meatballs, Tefteli, Turkey meatballs, jewish food
Comment

Okonomiyaki for Hanukkah

December 5, 2017

As written for THE NOSHER

The Japanese word Okonomiyaki is derived from two words: okonomi “how you like it” and yaki “grill.” Okonomiyaki is a customizable Japanese savory vegetable pancake. Like a latke, it gets cooked in oil in a fritter formation. Unlike a latke, it’s usually made into a large plate-sized pancake comprised mainly of cabbage. Food historians have linked the rise in popularity of okonomiyaki in Japan to World War II, when rice was more scarce and this recipe offered a filling meal or snack with a wheat-based starch. Throughout Japan there are regional differences and countless variations of okonomiyaki, but the most common form of the dish involves a batter made of flour, a variety of mountain yam, eggs, shredded cabbage, green onion, dashi, and often the addition of pork belly. It gets topped with its own tangy sweet sauce, Japanese mayonnaise, and bonito flakes (katsuobushi).

I first fell in love with okonomiyaki on a trip to Japan. You can find it there in restaurants that specialize in the dish, but it’s also something that is prepared in home kitchens. The cabbage gets slightly crisp, tender and sweet when seared in oil on a flattop or skillet, and then it gets generously slathered with an umami rich sauce, along with a welcome drizzle of creamy mayo. The richness, sweetness, and tanginess of these components all work perfectly together. A few months after I got back from Japan, I ended up eating at Brooklyn’s Japanese Jewish restaurant, Shalom Japan. I didn’t hesitate to order their Jewish-influenced spin on okonomiyaki. They’re known to top it with pastrami, or even corned lamb tongue and sauerkraut. It became clear there that okonomiyaki is a perfect fit on a Jewish table with its base of humble cabbage and onion. The fried pancake part of it all called out “Hanukkah.”

I am a fan of all pancakes and fritters, and I set out to modify the classic Japanese version for a recipe that didn’t require access to a specialty food store, and that could be made with kosher ingredients. Full disclosure: my version lacks authenticity. If you’re going for the real deal you’ll need a batter made with an okonomiyaki flour mix, or nagaimo yam; this special kind of yam is added in powdered form to the flour mix, or gets grated fresh into the batter. The toppings should include bonito flakes, and the batter should be made with dashi. These ingredients can be found at most Japanese markets. Instead of nagaimo yam, my version uses a batter of flour and potato starch, and instead of dashi I use water. I’ve also included a recipe for homemade traditional okonomiyaki sauce that can be made simply with easy to find ingredients, but you can also buy premade bottled sauce. You can make these pancakes large-sized and cut into wedges like the Japanese do, or slightly smaller à la a large latke. I wouldn’t go too small with this, as the vegetables tend to hold together better en masse. This recipe doesn’t need to be too exact and it works as a blank canvas for additional vegetables like kale, mushrooms, and/or daikon. In the spirit of Hanukkah, these okonomiyaki get cooked in oil, but they’re not heavily fried. The oil used to fry the Okonomiyaki gives a loving nod to the miracle of the oil glowing for eight days instead of one in the Temple, but the heap of vegetables and addictive sauce make this a nutritious and satisfying addition to any Hanukkah meal.

ingredientshotokonomiyaki.jpg

Okonomiyaki for Hanukkah

Serves 4

Ingredients:

For the pancakes-

  • ¾ cup all purpose flour or gluten free all purpose mix
  • ¼ cup potato starch or cornstarch
  • 1 teaspoon baking powder
  • 1 teaspoon kosher salt
  • 2 large eggs
  • ½-¾ cup water
  • ½ green cabbage, about 4½ packed cups
  • 3 green onions, sliced thin plus more for garnish if desired
  • 1 carrot, peeled and shredded
  • 4-5 inches daikon, peeled and shredded (optional)
  • Oil as needed (i.e. sunflower, canola, or peanut)
  • Sesame seeds, for topping (optional)
  • Mayonnaise, for topping (optional)

For the okonomiyaki sauce-

  • ½ cup ketchup
  • ¼ cup Worcestershire sauce
  • 2 Tablespoons soy sauce
  • 2 Tablespoons honey or agave syrup, or to taste
cutvegetables.jpg

Directions:

  1. Start by making the batter. Whisk together the flour, starch, baking powder and salt in a large bowl.
  2. In a separate bowl beat the eggs. Add the eggs and ½ a cup of water to the flour mixture. Whisk until smooth. You want a fairly thin, crepe batter-like consistency. If you find it too thick, add another ¼ cup of water. Try not to overmix, you do not want to overdevelop the gluten. Allow the batter to rest in the fridge for 30 minutes to an hour.
  3. While the batter is resting, prepare the vegetables. Take out the thick core from the cabbage half, then cut the halved cabbage in two. Thinly slice or shred the cabbage. Thinly slice the green onions. Grate the carrot and daikon if using.
  4. Make the okonomiyaki sauce: combine the ketchup, Worcestershire, soy sauce, and honey/agave in a bowl. Taste and adjust to your liking. The sauce should be tangy, savory, and a little sweet.
  5. Combine the batter with the vegetable mixture.
  6. Heat a cast iron skillet or a nonstick-skillet with about 3 tablespoons of oil over high heat. Once the oil is glistening and hot lower the heat to medium low, and, add some of the cabbage mixture to the pan, gently nudge it into a circle shape. I like to make each pancake with about 2 cups of the mixture. For me, that makes an ideal sized pancake that isn’t too hard to flip, and one that will hold together. Cover the skillet with a lid for 3-4 minutes. Carefully flip over the pancake, and cover it with a lid for an additional 3-4 minutes, or until browned on both sides and cooked through. Make sure not to cook on too high of a heat or the pancake might burn while remaining raw in the center.
  7. Serve hot topped with a generous spread of the okonomiyaki sauce, mayo if desired, sliced green onions and sesame seeds.
  8. Slice and serve!
2closeupokonomiyaki_secondaryphoto.jpg
In Dinner, Lunch, Vegetarian Tags Hanukkah, Okonomiyaki, Kosher food, kosher, jewish food, japanese food
Comment
SquashOnionBurekas_favorite.jpg

Butternut Squash and Caramelized Onion Burekas

November 20, 2017

This is a seasonal twist on classic burekas that I wrote up for alma. (check out their site for the full article). The caramelized onions are the key ingredient in this dish; they always take longer than you think to caramelize, but the resulting flavor is worth the work. This makes a great side, appetizer, or snack during the holidays. 

Butternut Squash and Caramelized Onion Burekas

Makes 24 burekas

INGREDIENTS

  • 2 sheets puff pastry (10” x 15”), defrosted in the refrigerator overnight
  • 1½ lbs. butternut squash (1 large squash), halved lengthwise and seeds removed
  • 1 large yellow onion, medium diced
  • 2 tablespoons olive oil or butter
  • 1 big fat clove of garlic or 2 medium-sized, minced fine
  • 1 teaspoon ground coriander
  • 2-3 sprigs thyme, leaves removed from stems
  • Pinch of cayenne pepper
  • Salt and pepper, to taste
  • 1 large egg yolk
  • Black and/or white sesame seeds, to garnish

DIRECTIONS

Preheat the oven to 375°F.

Drizzle the halved butternut squash with oil, then place it cut-side down on a sheet pan. You don’t need to peel the squash. Roast until the squash is fully cooked and tender, about 35-45 minutes.

roastedsquash.jpg

While the squash is baking, caramelize your onion by putting a few tablespoons of butter with a drizzle of olive oil in a sauté pan over medium low heat. If keeping the dish non-dairy, use just olive oil. Add the diced onion to the pan, and sauté over low or medium low heat until starting to soften, about 5 minutes. Season with a generous pinch of salt and then continue to let the onion cook and caramelize, stirring occasionally so the onion doesn’t burn; make sure to keep the heat fairly low. This is where patience comes in, beautiful caramelized onions can take 30-45 minutes to make. You want your onions golden and sweet, you don’t need to caramelize them until they’re a deep brown. This is a good tutorial if you need it.

Add the minced garlic to the caramelized onions, and sauté for another 2-3 minutes or until the garlic is fragrant but not at all browned. Turn off the heat.

caramelizedonions.jpg

Once the squash is cooked and slightly cooled, scoop the inside of the squash into a bowl and discard the peel. Add the caramelized onion to the squash. Mix together. The mixture should be soft and not too lumpy.

Mix in the ground coriander, thyme, and cayenne. Taste, and then season with salt and pepper as desired. Allow the squash mixture to cool before assembling the burekas. You can make this filling up to two days in advance and store in the fridge.

To assemble the burekas: roll out a sheet of puff pastry until rectangular and just slightly thinner than when it comes out of the package. Divide the dough into 12 squares: cut the dough in half widthwise, and then cut each half into half again. Next, cut the dough into thirds lengthwise. Put a spoonful of the filling into each square. Fold over the dough to form a triangle shape, and press the edges together. There’s no need to crimp or press too hard, the filling will stay put, and you want to ensure there are layers of flaky pastry.

processshotofburekas.jpg

Transfer the formed triangular burekas onto a baking sheet, place each bureka about an inch apart, 12 will fit on each baking sheet. At this point, you can freeze the burekas and reserve them for when you’re ready to bake.

Before baking, combine the large egg yolk with a small splash of water. Beat well. Brush the tops of the burekas with the egg wash. Sprinkle with sesame seeds.

formedburekasprebaking.jpg

Bake for 20-25 minutes, or until golden brown and flaky. Transfer to a wire baking rack, and allow to cool for at least 10 minutes before serving. Burekas are best served warm or at room temperature.

squashburekassecondaryphoto.jpg
In Holiday, Dinner, Lunch, Appetizer Tags jewish food, kosher, burekas, squash burekas, caramelized onion, appetizer, holiday food, thanksgiving, thanksgiving food, jewish thanksgiving, pastry, homemade, baked goods
Comment
mbphotopdown.JPG

Matzah Ball Pho

October 23, 2017

I wrote up my matzah ball pho recipe for The Nosher. Head over there to read the full article, and check out other great recipes :)

MATZAH BALL PHO

Ingredients

For the broth:

  • 2 medium unpeeled yellow onions, halved
  • 1 large 4”-5” piece of ginger, cut in half lengthwise
  • 5 quarts cold water
  • 1 4-5 lb. chicken, cut into parts
  • ½ lb. chicken wings
  • 2 tsp kosher salt, or to taste
  • 1 Tbsp rock sugar or Turbinado (raw) sugar
  • 1 cinnamon stick
  • 2 star anise
  • 1 tsp whole coriander seeds
  • 2 Tbsp fish sauce or tamari
  • 1 small white onion, thinly sliced
  • 4 scallions, thinly sliced

For the matzah balls:

  • 1 cup matzah meal
  • 1 teaspoon kosher salt
  • 1 teaspoon baking powder
  • ½ teaspoon baking soda
  • 4 large eggs, beaten
  • ¼ cup schmaltz or oil (vegetable or safflower)
  • ¼ cup minced scallion
toppings.JPG

For the toppings:

  • 1 large bunch of fresh Thai basil
  • 2-3 limes cut into wedges
  • 3 cups mung bean sprouts
  • 2 Fresno chilies or jalapenos, sliced thin
  • Hoisin sauce, to taste
  • Sambal oelek (garlic chili sauce), to taste
  • Sriracha, to taste

Directions

To make the broth:

  1. Char your onions and ginger by either placing them on a baking sheet under a broiler for 8-10 minutes or by charring them over a gas flame on your stovetop for a few minutes on each side. The onions and ginger should be nicely charred but still firm — this essential step will deepen the broth’s flavor. Once the onions and ginger are charred, remove the skin from the onion. Rinse the onion and ginger, and use a small knife to scrape off excess charred bits to prevent your broth from getting murky.
  2. Cut your chicken into parts, separating the breasts, legs, wings and backbone. This will ensure that your chicken cooks evenly and that the breasts will not become dry or tough when simmered.
  3. In a small skillet over medium heat, toast the cinnamon, anise and coriander until lightly browned and fragrant, about 2-3 minutes. Be careful not to burn the spices. Add the onion, ginger and chicken to a large pot. Fill the pot with 5 quarts of water. Bring the water to a simmer; skim the impurities as they rise to the top.
  4. After 20 minutes of simmering, or once they’re cooked through, remove the chicken breasts and allow them to cool. Add the toasted spices, salt and sugar to the pot. Continue to gently simmer the mixture for 1 hour.
  5. Remove the remaining chicken parts and strain the liquid through a fine meshed sieve. Bring the liquid back to a simmer for another 20-30 minutes, or until the liquid has reduced by about a quarter. This step will further deepen the broth’s flavor.
  6. While the broth is simmering, shred the chicken meat and reserve for serving. Once reduced, turn off the heat and add the fish sauce or tamari to the broth. Taste, and add additional seasoning if desired.
formedballs.JPG

To make the matzah balls: 

  1. While the soup is simmering, in a large bowl whisk together the matzah meal, salt, baking powder and baking soda. Add the beaten egg and schmaltz/oil. Add the scallions. Mix everything together until just combined. Do not over-mix.
  2. Refrigerate the mixture for at least 30 minutes, and up to a day.
  3. Form the matzah ball mixture into even-sized balls. You can determine the size based on your preference, but know that they will double when cooked. It makes it easier to form the matzah balls if you rub a little oil on your hands beforehand.
  4. Bring a large pot of water to a boil. Lower to a simmer and gently drop the matzah balls into simmering water. Place the lid on the pot and continue to simmer for 30 minutes. Once cooked, matzah balls are best stored in their cooking liquid.

To serve the matzah ball pho:

  1. Add the shredded chicken, raw sliced onion and scallions to a bowl. Ladle hot broth into the bowl. Add the matzah balls to the soup.
  2. Serve along with basil, bean sprouts, lime wedges, hoisin and hot sauces. Allow people to garnish and customize their pho to their liking.

Note about the recipe: Traditional Pho Ga calls for fish sauce in its broth. Fish sauce is made of fermented anchovies. Red Boat makes one that is certified kosher, but many who keep strictly kosher will not combine fish and meat in the same dish. To make this kosher, you can use tamari in lieu of fish sauce for extra umami flavor in the broth.

mbphosideview.jpg
In Dinner, Lunch, Holiday Tags pho, matzo ball, matzah ball, matzah ball pho, soup, jewish food, kosher food, dinner
Comment
allthreedishes.jpg

Recipes for Tu B'av - for .alma magazine

August 3, 2017

My article with recipes for Tu B'av (the Jewish Day of Love) is up on .alma right now!

Below is the dish that I can't stop eating right now. It's more of a recommendation than a recipe - which is my favorite kind of dish to make. And is there anything better than tomatoes in August? They help me get through the dog days of summer here in Los Angeles. You need so little to make them good. And in my humble opinion, beautiful sweet tomatoes, heavily salted, on crisp good bread with excellent butter is incredibly romantic. Enjoy!

Tomato Thyme Toasts

Serves 8-10

  • Baguette or small loaf of good crusty bread, cut into ¾” slices
  • 2 lbs. of your favorite tomatoes
  • 6-7 fresh thyme sprigs, leaves removed from stem
  • Butter (splurge on some good stuff)
  • Maldon salt or kosher salt, to taste
  • Good extra virgin olive oil, to taste

Preheat the oven to 375°F.

Slice the tomatoes into rounds, just under ½” thick. Lightly salt the tomato slices. The salt will start to soften the tomatoes and season them all the way through.

Place the bread slices on a baking sheet. Drizzle lightly with olive oil. Bake the bread for 6-8 minutes, or until just toasted and beginning to brown on the edges. Once the bread is toasted, spread butter onto each piece. This dish is all about layering of fats and salt with the tomatoes.

Top the toasts with the tomato slices. Top the tomato slices with thyme leaves. Drizzle with a little more olive oil (for a little more oomph). Sprinkle Maldon salt over everything – this will add a nice salty crunch.

You can bake the toasts ahead of time and assemble them with tomatoes when you’re ready to serve, the bread doesn’t have to be hot, and the tomatoes will mellow out the bread’s crunch.

______________________________________________________________________

In Lunch, Holiday, Appetizer Tags jewish holiday, jewish food, kosher, tu b'av, holiday, holiday food, romantic food, tomato toast
Comment
Photo by Eric Slatkin

Photo by Eric Slatkin

Mexican Inspired Matzo Brei

April 19, 2016

Matzo Brei is easily one of my favorite types of Passover food tied only with matzo pizza (because pizza anything is the best). 

There are endless variations on matzo soaked in egg and cooked in fat (ideally butter). This is my favorite version: it's reminiscent of Huevos Rancheros or even a good Chilaquiles. The crispy buttery matzo combines perfectly with a little heat from the sauce, creamy avocado, and fresh cilantro. 

Ranchero sauce is made of chilis, peppers, and aromatics that are cooked and blended together, but you can also find many good pre-made Ranchero salsas at the market. It can also be substitutes with almost any another kind of chili based sauce that you prefer. 

Whether you make the matzo brei savory, sweet, or spicy, I've learned that one thing that is critical for good brei is a generous amount of butter or oil. Without a good amount of fat, the matzo can become dry and brittle. With fat the matzo is creamer and gets crisped and golden on its edges.

This recipe is featured in our Passover Assembly Line series! Video below.

Chag Sameach!

Mexican Matzo Brei

Serves 2-4

for the matzo brei-

  • 4 matzos
  • 4 large eggs
  • 2-3 tablespoons heavy cream
  • 1 tablespoon ranchero salsa (homemade or store bought)
  • ½ teaspoon salt
  • ½ teaspoon ground cumin
  • ½ teaspoon ground coriander
  • ¼ teaspoon chili powder
  • 4 tablespoons butter

for the toppings-

  • 1 avocado, cut into thin slices
  • 2 scallions, sliced thin
  • ½ cup cilantro leaves
  • sour cream, to taste
  • hot sauce, to taste

Start by breaking up your matzo into large chunks into a sieve or colander. It’s ok if the matzo pieces are uneven. Rinse the matzo under cold water until dampened and just softened, about 10-15 seconds.

In a large bowl, whisk the eggs, cream, ranchero salsa, spices, and salt together. Add the soaked matzo to the bowl, and stir until the matzo is coated in the egg mixture.

Heat a large nonstick or well-seasoned cast-iron skillet over medium heat. Add the butter to the pan. Once the butter has fully melted, add the matzo mixture to the pan in an even layer. Allow the matzo to cook and brown on one side for  2-3 minutes. Flip the matzo pieces over and cook them on the other side until they are nicely browned as well, another 2-3 minutes.

Transfer to a large serving platter or individual plates. Top with sliced avocado, fresh scallion, cilantro, and sour cream and hot sauce if desired. Serve immediately.

In Holiday, Breakfast, Lunch Tags Passover, pesach, matzo brei, matzah brei, matzo, mexican, mexican jewish, jewish food, vegetarian
Comment

Latest

Featured
IMG_3606.jpeg
May 27, 2025
Sheet-pan Lemony Potatoes and Baby Artichokes
May 27, 2025
May 27, 2025
IMG_3784.jpeg
May 12, 2025
The Secret to Crispy Tofu Every Time + A Sweet & Spicy Gochujang Glaze
May 12, 2025
May 12, 2025
snackingcakeslices copy.jpg
Apr 11, 2025
One-bowl blueberry lemon snacking cake (gluten-free/grain-free)
Apr 11, 2025
Apr 11, 2025
IMG_5075.JPG
Feb 24, 2025
Manti (meat dumplings) in brothy tomato sauce
Feb 24, 2025
Feb 24, 2025
matzoballsontablecloth.jpg
Jan 20, 2025
Golden Chicken Soup with Matzo Balls
Jan 20, 2025
Jan 20, 2025
harissatofuandchickpeas.jpg
Dec 18, 2024
Sheet-Pan Crispy Harissa Tofu, Chickpeas, and Broccolini
Dec 18, 2024
Dec 18, 2024
caracaracake.jpg
Dec 4, 2024
Cara Cara Orange Olive Oil Cake
Dec 4, 2024
Dec 4, 2024
IMG_0640.JPG
Nov 6, 2024
Easy Roast Turkey for Thanksgiving
Nov 6, 2024
Nov 6, 2024
IMG_3282.JPG
Sep 19, 2024
Apple and Honey Dumplings
Sep 19, 2024
Sep 19, 2024
IMG_7173.jpeg
Jul 31, 2024
Galette with any kind of fruit
Jul 31, 2024
Jul 31, 2024
IMG_4004.jpeg
May 9, 2024
Cheddar Cheese Coin Crackers
May 9, 2024
May 9, 2024
DSC02602.JPG
May 2, 2024
Asparagus, Gruyere & Swiss Tart
May 2, 2024
May 2, 2024
whitebeansoupwithzhug.JPG
Mar 11, 2024
Yemenite White Bean Soup with Zhoug
Mar 11, 2024
Mar 11, 2024
DSC02301 (1).jpeg
Jan 24, 2024
Celery, kohlrabi, date salad with toasted almond and sesame
Jan 24, 2024
Jan 24, 2024
DSC02138.jpg
Dec 3, 2023
Sweet potato latkes with cranberry salsa
Dec 3, 2023
Dec 3, 2023
kompot_main photo.JPG
Jul 11, 2023
Ukrainian Summer Fruit Kompot
Jul 11, 2023
Jul 11, 2023
cherryvareniki mainphoto.jpg
Jun 15, 2023
Cherry Vareniki
Jun 15, 2023
Jun 15, 2023
tzimmescaketopdown.jpg
Apr 19, 2023
One-Bowl Tzimmes Cake
Apr 19, 2023
Apr 19, 2023

Sign up with your name and email address to join my mailing list.

I respect your privacy.

Thank you!

Privacy Policy can be found here

All photos copyright of Sonya Sanford unless otherwise indicated